
ESP8266 Ilonda Fish Feeder is the ideal solution for modern smart homes. Combining the power of the ESP8266 microcontroller with the Ilonda Fish Feeder system, this setup allows for precise, automated feeding schedules that you can control from anywhere. Whether you’re at home, at work, or on vacation, the ESP8266 Ilonda Fish Feeder keeps your fish healthy and happy by providing regular meals on a set schedule. This smart feeder is perfect for hobbyists and professionals alike who want to upgrade their aquarium experience with reliable and customizable feeding technology.
The ESP8266 Ilonda Fish Feeder stands out in the world of smart aquarium gadgets for its versatility and ease of use. Unlike traditional feeders that require manual setup and offer limited control, this system integrates seamlessly with your existing smart home environment. Thanks to the ESP8266’s robust Wi-Fi capabilities, the feeder can be easily connected to your network, allowing you to program feeding times, adjust portion sizes, and monitor the feeder’s status all from a dedicated app or web interface. Imagine the peace of mind you’ll have, knowing your fish are always well-fed and cared for, even when you’re not around.
One of the best features of the ESP8266 Ilonda Fish Feeder is its flexibility. You can create a fully customized feeding schedule that meets the specific needs of your fish, whether they require multiple small feedings throughout the day or a single large feeding. The ESP8266 microcontroller’s adaptability means that you can also integrate this feeder with other smart devices in your home, creating a truly interconnected aquarium management system. From sending notifications to your phone when it’s time to refill the feeder to integrating with smart lights that simulate a natural day-night cycle, the possibilities are endless with the ESP8266 Ilonda Fish Feeder.
By choosing the ESP8266 Ilonda Fish Feeder, you’re not just buying a fish feeder; you’re investing in a smarter, more efficient way to care for your aquatic pets. This cutting-edge technology ensures your fish receive consistent, accurate feedings, reducing waste and promoting a healthier tank environment. Say goodbye to the hassle of manual feeding and hello to a new era of smart aquarium management with the ESP8266 Ilonda Fish Feeder.
Kit List:
1x Ilonda Intelligent Wifi APP Fish Feeder
https://www.aliexpress.com/i/2255799886082555.html?gatewayAdapt=4itemAdapt
1x ESP8266 ESP-12F
https://www.amazon.co.uk/dp/B06Y1ZPNMS?ref=ppx_yo2ov_dt_b_product_details&th=1
1x Micro USB cable to connect the ESP chip to your device
1x Soldering Iron and soldering wire
https://www.amazon.co.uk/dp/B06Y1ZPNMS?ref=ppx_yo2ov_dt_b_product_details&th=1
1x ESPHome add-on setup on Home Assistant
ESPHome ilonda wifi smart fish feeder info – https://devices.esphome.io/devices/ilonda-wifi-smart-fish-feeder
Steps:
- Connect the ESP board via the micro USB port to your pc, launch chrome and navigate to your home assistant server (http://homeassistant.local:8123). Select ESPHome from the left-hand menu. Now select New Device in the bottom right-hand corner of your screen. (Chrome must be used to connect to the ESP device)
- In the device name box give the device a meaningful name like “Fish-Feeder” and select next
- On the installation window select “Connect”
- A box should now appear listing a COM port associated with the ESP device (if you can’t see the device then most likely you will need to install the driver as per on screen instructions) Select the COM port and hit connect.
- ESP will then install the latest firmware on the device and also gives it a basic configuration.
- Once this has been completed you will see the device listed in the ESPHome dashboard. We now need to configure it to control the feeder, select edit on the newly added device and copy in the following yaml.
esphome:
name: fish-feeder
friendly_name: Fish Feeder
esp8266:
board: esp01_1m
logger:
# Enable Home Assistant API
api:
encryption:
key: "Your KEY HERE"
ota:
password: "YOUR PASSWORD HERE"
wifi:
ssid: !secret wifi_ssid
password: !secret wifi_password
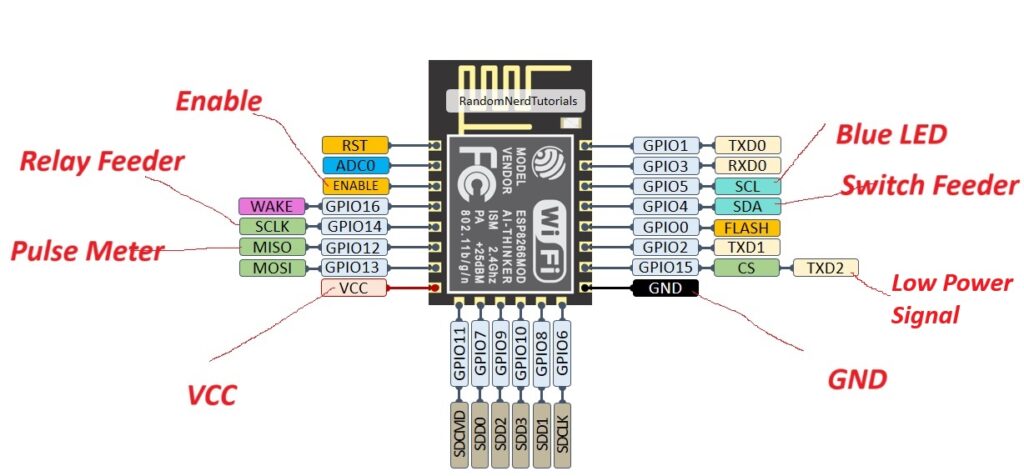
# Binary Sensor to allow relay to be switched when physical button is pressed
binary_sensor:
- platform: gpio
id: button
pin:
number: GPIO4
mode:
input: true
pullup: true
inverted: True
name: 'Switch feeder'
on_press:
- switch.turn_on: relay
- platform: status
name: "Status"
switch:
# Switch to turn feeder on for 3 seconds/off and turn on/off LED
- platform: gpio
name: 'Relay feeder'
id: relay
pin: GPIO14
on_turn_on:
- light.turn_on: led
- delay: 3s
- switch.turn_off: relay
- light.turn_off: led
restore_mode: ALWAYS_OFF
sensor:
# Feeder counter
- platform: pulse_meter
pin: GPIO12
name: 'Counter/min'
unit_of_measurement: 'time(s)'
internal: true
total:
unit_of_measurement: 'time(s)'
name: 'Counter feeder'
# To allow led to be controlled via GPIO
output:
- platform: esp8266_pwm
id: blue_led
pin:
number: GPIO5
inverted: true
# LED control
light:
- platform: monochromatic
output: blue_led
id: led- Now select save and install, once the installation has completed you can disconnect the ESP board from the USB and heat up the soldering iron.
- We now need to carefully unsolder the ESP chip from the board. Once we have removed it, we then need to open the fish feeder and remove the chip that has come on the fish feeder circuit board, this chip is locked so we are unable to reflash it.
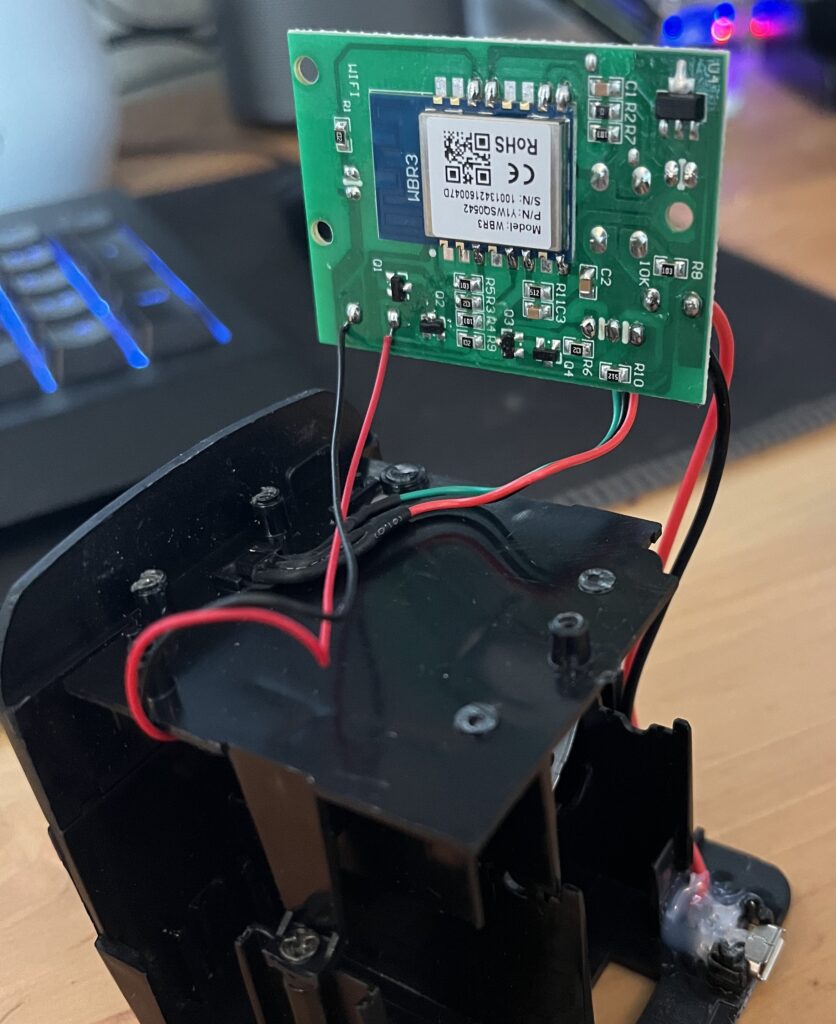
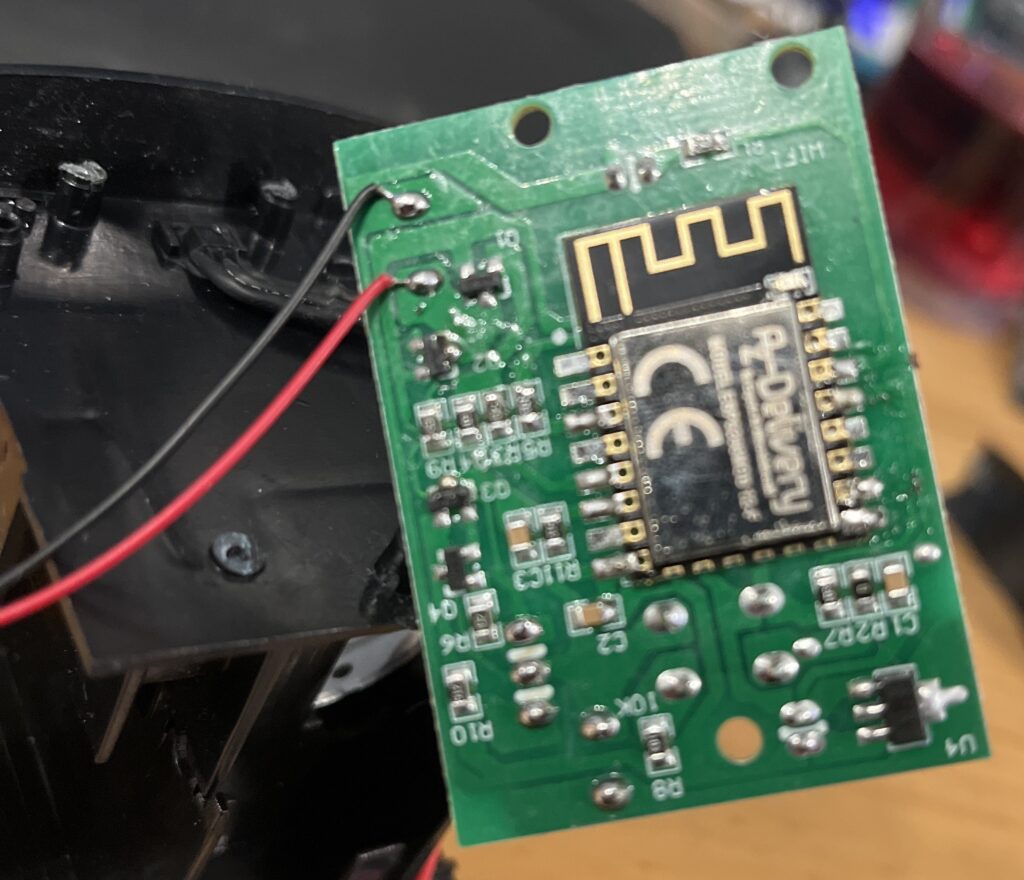
- With the ESP 8266 chip we flashed previous step, we now need to solder this chip on to the fish feeder circuit board on the following pins
- Once the chip is soldered on, we can re-assemble the fish feeder and power it on. Once the device is powered on it should appear on the settings > Devices & Services page of home Assistant as a new device read to configured.
